Configuring Platform Data Sync
Rutter offers a flexible data sync configuration that allows you to choose which data you want to sync from your connected platforms. This guide will walk you through the process of setting up your data sync configuration.
Exploring the Data Sync Configuration
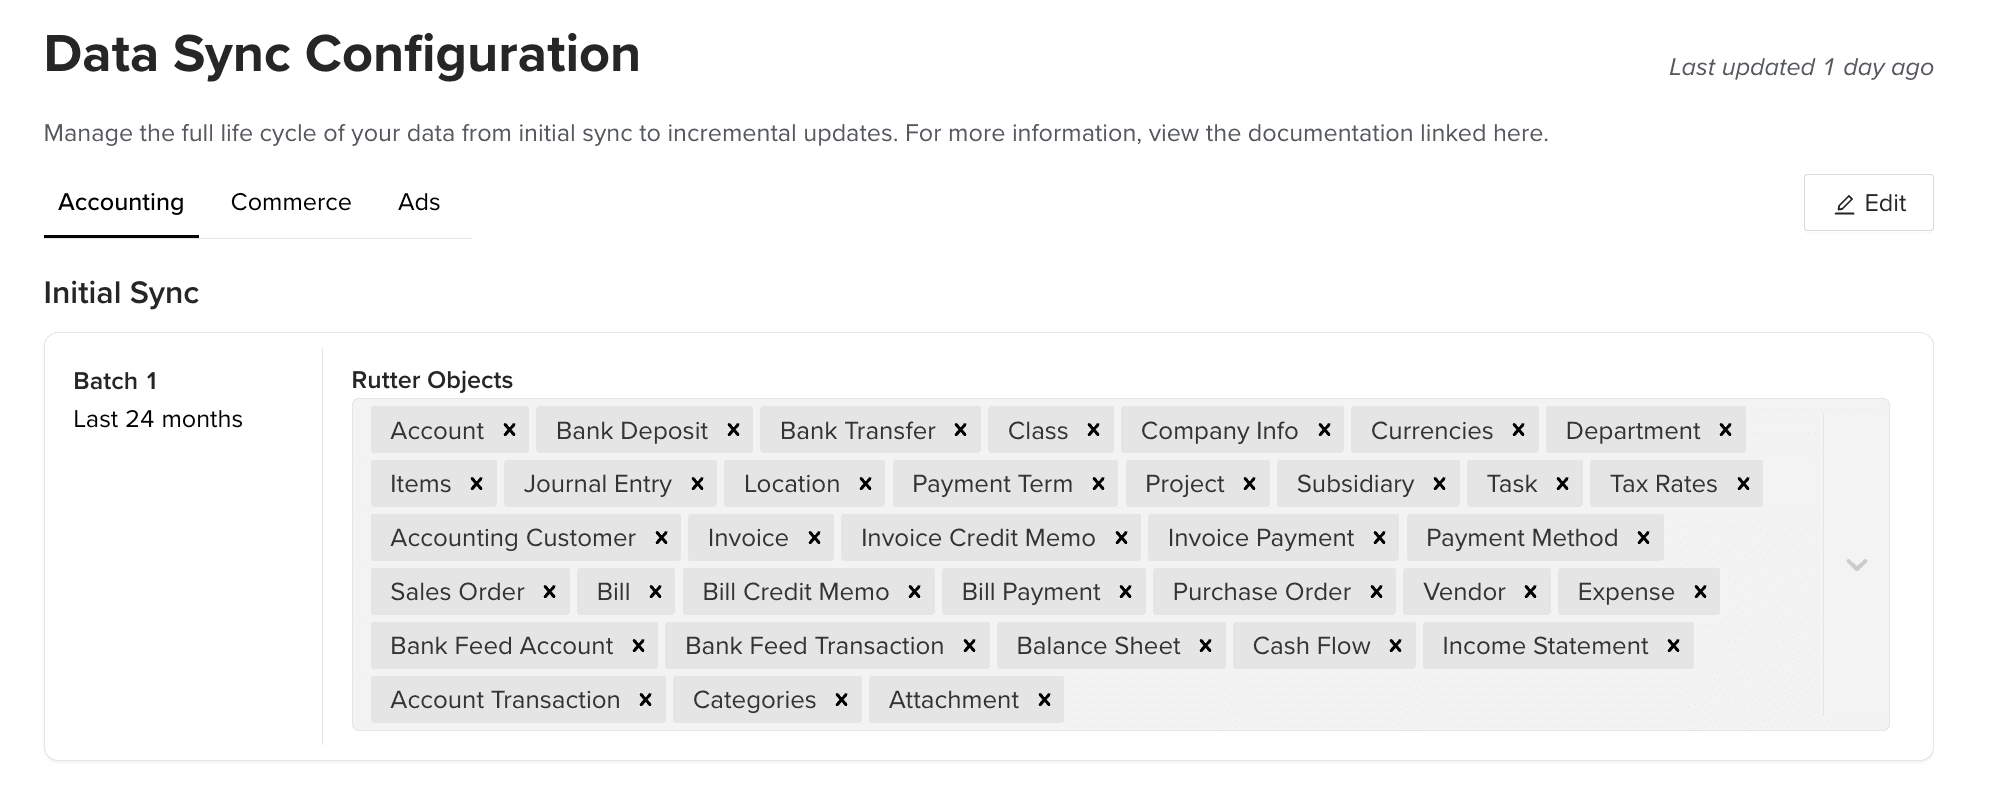
You can view your organization's data sync configuration in the Rutter Dashboard by clicking the "Data Sync Configuration" on the left-hand navigation bar.

Your organization may have a default data sync configuration set up to fetch the last 24 months of data for all object types.
The data sync configuration is divided into 3 different sections:
- Commerce
- Accounting
- Ads
Each section has a list of Rutter Objects that will be synced from the corresponding platform during the Initial Sync and Incremental Sync. The Initial Sync refers to the first data sync that occurs when a new connection is created in Rutter, which fetches historical data. After the initial sync, Rutter will periodically perform an Incremental Sync at a regular interval to fetch new and updated data from the platform.
In order for a Rutter endpoint to return historical data for a specific object, it must be specified in the data sync config. For example to retrieve chart of accounts data in GET /accounting/accounts, you must have added the Account object to your data sync config.
For the Accounting data objects, there are some prepopulated options that can be used in the data config editor, noted below:
- All Rutter Objects
- All Expense Management Objects
- All Accounts Payable Objects
- All Accounts Receivable Objects
- All Underwriting Objects

You do not need to add an object to your data sync config to make POST requests to create new objects. For example, to create a new account in the chart of accounts you do not need to add the Account object. However, this means you will only receive the accounts you have created with Rutter through the GET /accounting/accounts endpoint.
Editing your Data Sync Configuration
Fetching data from the external platform can be time consuming for large connections. In addition, fetching all types of data may require your application to ask for more permissions than it needs. To address these issues, Rutter allows you to edit your data sync configuration from the dashboard.
There are two main levers you can adjust:
The lookback window of the
Initial Sync.The lookback window of the
Initial Syncrefers to the amount of historical data that is fetched during the initial sync. Adjusting this to be lower can significantly reduce the time it takes to fetch data during the initial sync. This value applies only totransactiontype data, such asOrders,Bills,Expenses, etc. Rutter will always fetch all data for non-transaction types, such asCustomers,Products, andAccounts.
The
Rutter Objectsthat are synced in theInitial SyncandIncremental Sync.Each
Rutter Objectcorresponds to aGETendpoint that theRutter APIexposes. For example, if you need to fetch accounts via theGET /accounting/accountsRutter endpoint, then you will want to ensure theAccountobject is being synced in your Data Sync Configuration. It is recommended to customize the list ofRutter Objectsthat are synced to only sync what is necessary for your business.
Advanced Use Cases
Configuring Multiple Batches
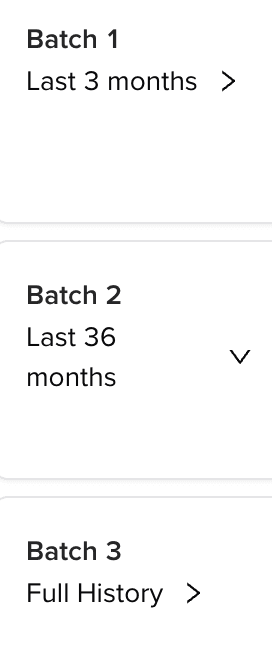
Sometimes your business requires that certain types of data are prioritized over others and synced as quickly as possible, or that some types of data require a longer historical lookback. During the Initial Sync, it is possible to define multiple "batches" of data to fetch, each with a different set of Rutter Objects and a different lookback. Batches are fetched in order. After the first batch is complete, an INITIAL_UPDATE webhook is fired. After each subsequent batch, a HISTORICAL_UPDATE webhook is fired. For more information, please see the Connection Webhooks page.

Adjusting Incremental Sync Frequency
The Data Sync Configuration page of the dashboard shows the current Inremental Sync Frequency. However, you are unable to adjust this period through the dashboard for the time being. If your business requires a different incremental sync frequency, please reach out to your Rutter Customer Success Manager.
Platform Configuration
To see how Rutter objects would map to Platform Objects for your desired platforms, use the Platform Configuration option at the bottom of the Data Sync Configuration page.

This is an example breakout object mapping for Quickbooks Online, as an example:
| Rutter Objects | Platform Objects |
|---|---|
| Account | Account |
| Account Transaction | Order, Product |
| Accounting Customer | Customer |
| Ads Account | Order, Product |
| Ads Invoice | Order, Product |
| Attachment | Order, Product |
| Balance Sheet | Balance Sheet |
| Bank Deposit | Bank Deposit |
| Bank Feed Account | Order, Product |
| Bank Feed Transaction | Order, Product |
| Bank Transfer | Bank Transfer |
| Bill | Bill, Tax |
| Bill Credit Memo | Vendor Credit |
| Bill Payment | Bill Payment |
| Campaign | Order, Product |
| Campaign Daily | Order, Product |
| Cash Flow | Cash Flow |
| Category | Order, Product |
| Class | Class |
| Commerce Customer | Order, Product |
| Company Info | Company Info |
| Currency | Currency, Preference |
| Customer Group | Order, Product |
| Department | Department |
| Expense | Expense, Journal Entry, Tax |
| Income Statement | Income Statement |
| Invoice | Invoice |
| Invoice Credit Memo | Invoice Credit Memo |
| Invoice Payment | Invoice Payment |
| Item | Item |
| Journal Entry | Journal Entry |
| Location | Location |
| Order | Order, Product |
| Payment Method | Payment Method |
| Payment Term | Payment Term |
| Payout | Order, Product |
| Product | Order, Product |
| Project | Order, Product |
| Purchase Order | Purchase Order |
| Sales Order | Sales Order |
| Store | Order, Product |
| Subscription | Order, Product |
| Subsidiary | Order, Product |
| Task | Order, Product |
| Tax Rate | Tax Code, Tax |
| Transaction | Order, Product |
| Vendor | Vendor |