Rutter Connect Quickstart
Rutter Connect Quickstart
This guide walks through connecting an MCP-compatible agent (Claude Desktop in this example) to Rutter Connect against a sandbox merchant. You'll go from zero to a working get_cash_position call in about 5 minutes.
Already have a production Rutter account? You can swap the sandbox connection for any production connection at step 3. The rest of the flow is identical.
Step 1: Get your Rutter Connect credentials
- Sign in to the Rutter Dashboard.
- Open the Rutter Connect tab in the left rail.
- Copy the MCP endpoint URL and bearer token. The token authenticates your MCP client to Rutter Connect; it is scoped to your Rutter org and rotates independently of your
client_id/client_secret.
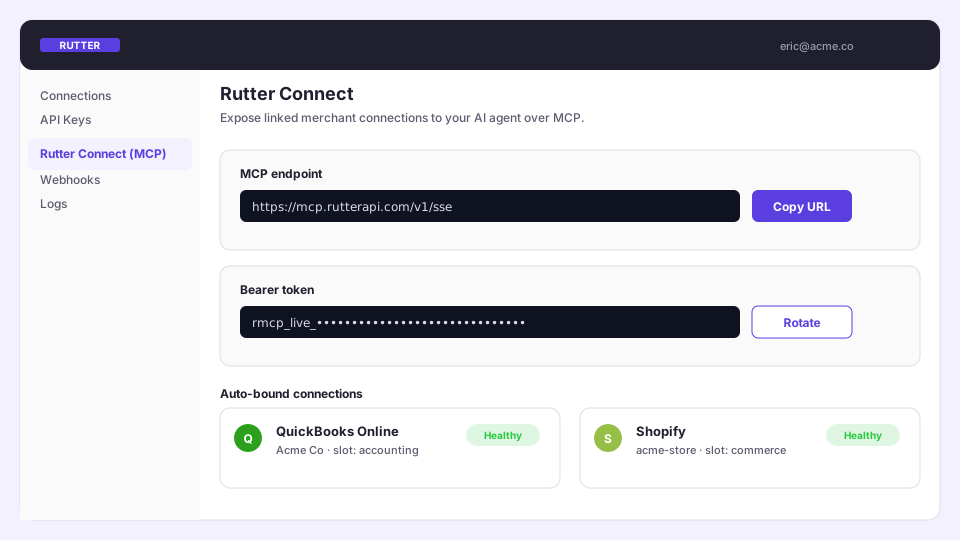
Treat the bearer token like an API key. Don't commit it to source — keep it in .env or your secret manager. Rotate it from the dashboard if it leaks.
Step 2: Link a sandbox connection
Rutter Connect resolves access tokens from the connections in your org. If you don't have one yet:
- Go to the Connections page.
- Click Create a Connection and pick a sandbox accounting platform (e.g. QuickBooks Online Sandbox).
- Walk through Rutter Link to bind the connection.
That connection now shows up under Auto-bound connections on the Rutter Connect tab. Repeat for a commerce platform (Shopify sandbox) if you want to test cross-domain queries.
Step 3: Point Claude Desktop at the endpoint
Open Claude → Settings → Connectors → Add MCP server and paste in the endpoint and token from step 1.
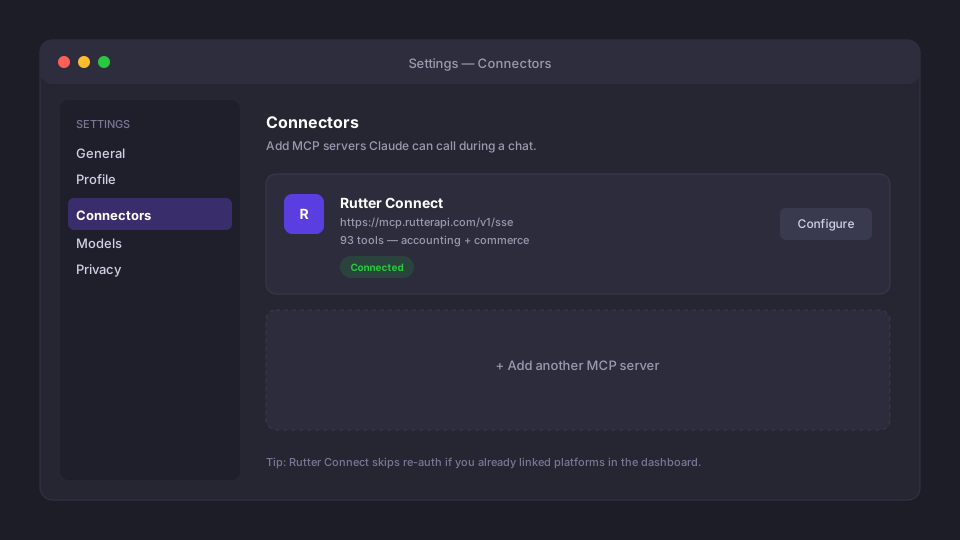
If you'd rather edit the config file directly (~/Library/Application Support/Claude/claude_desktop_config.json on macOS):
1{
2  "mcpServers": {
3    "rutter-connect": {
4      "url": "https://mcp.rutterapi.com/v1/sse",
5      "headers": {
6        "Authorization": "Bearer rmcp_live_..."
7      }
8    }
9  }
10}
Restart Claude Desktop. You should see Rutter Connect listed under Connectors with a green Connected badge and ~93 tools.
For Claude Code, add the same entry to your ~/.claude.json under mcpServers. For a custom MCP client, point your transport at the same URL with the bearer token in the Authorization header.
Step 4: Bind a connection in chat
In a new chat, ask the agent to log in:
Use Rutter Connect to log into accounting.
The agent will call login_to_rutter(domain="accounting"). Because you already linked a sandbox connection in step 2, Rutter Connect binds it into the session's accounting slot without opening a Link flow.
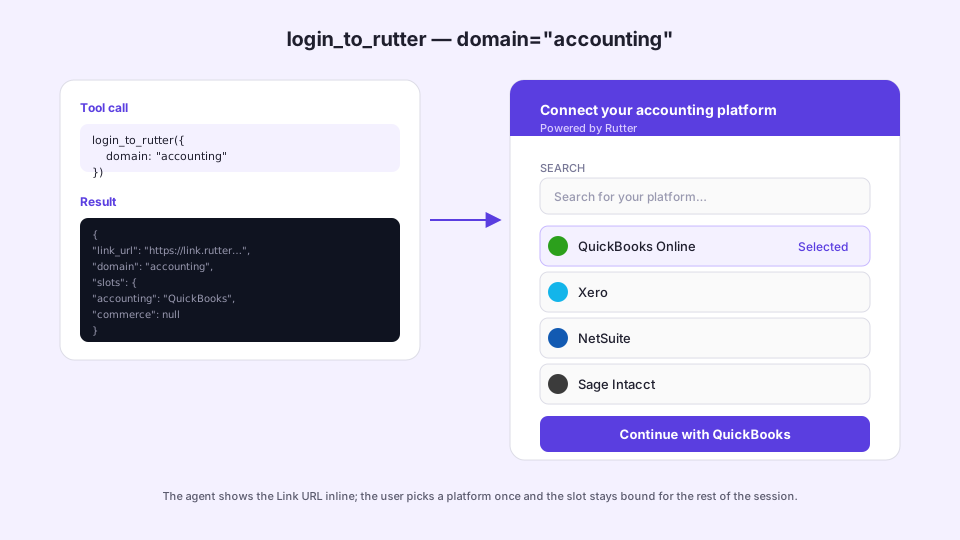
Inspect both slots at any time:
Show me the active connections.
The agent calls get_active_connection and reports what's bound in accounting and commerce.
Step 5: Run your first read
Ask:
What's our cash position?
The agent calls get_cash_position, which sums every bank account on the bound platform. You'll see the tool call rendered inline along with the structured result.
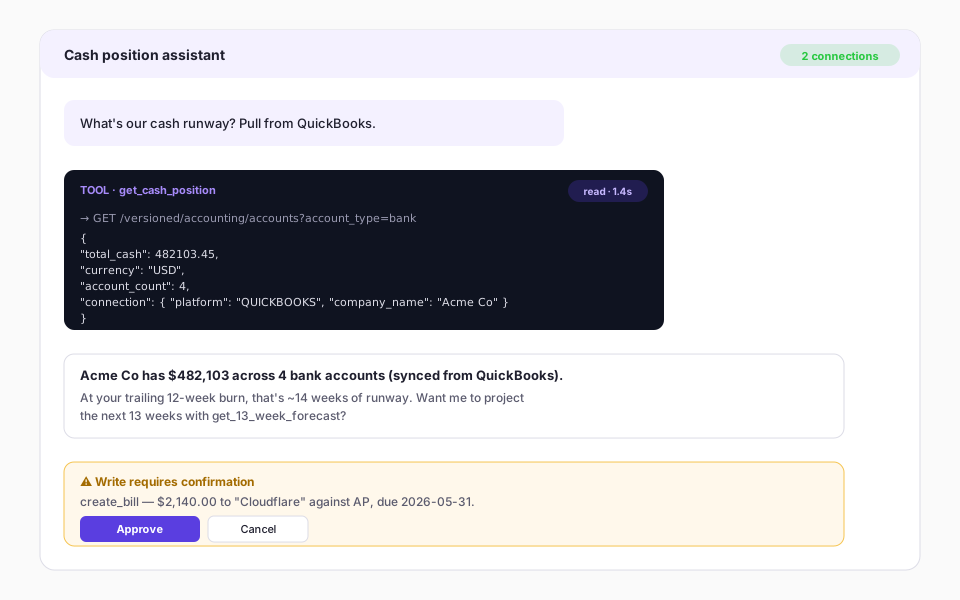
A few more reads worth trying on a sandbox:
1Pull the AR aging summary as of today.
2What bills are due in the next 30 days?
3Project the next 13 weeks of cash flow and call out the minimum-balance week.
4List the top 10 customers by outstanding invoice balance.
Step 6: Try a write (with confirmation)
Reads are forgiving; writes are not. Every mutation is gated by an explicit confirmation step.
Create a $2,140 bill for Cloudflare due May 31, 2026.
The agent constructs a create_bill payload and pauses for approval. After you click Approve, the bill posts and the response includes a source_url deep link (on QuickBooks Online and Xero) so you can verify it in the platform UI.
On most platforms delete_invoice and delete_bill void the record rather than hard-deleting it, to preserve the audit trail. NetSuite cannot delete posted journal entries — Rutter Connect returns a structured operation_not_supported with a suggestion to reverse the entry instead.
Step 7: Cross-domain in one turn
This is where the dual-slot session pays off. Bind a commerce connection too:
Now log into commerce.
Then ask a cross-domain question:
Compare last month's Shopify gross sales to revenue posted in QuickBooks. Flag the variance.
The agent calls list_orders (commerce slot) and get_revenue (accounting slot) in the same turn, normalizes the totals, and reports the gap.
Where to go next
Overview
Architecture, security model, and the full tool catalog.
Read the overviewRutter Link
How merchants link platforms — the auth Rutter Connect rides on.
Configure LinkCoverage Explorer
Per-platform support for every endpoint Rutter Connect wraps.
Browse coverageTroubleshooting
Claude Desktop says "0 tools". The bearer token is wrong or the endpoint is unreachable. Re-copy from the dashboard and restart Claude Desktop.
get_cash_position returns "no active accounting connection". You haven't bound the accounting slot yet. Ask the agent to call login_to_rutter(domain="accounting") — if no connection is pre-bound it will return a Link URL.
Write tool errors with operation_not_supported. The platform doesn't support that mutation. The error response includes a suggestion field with a workaround (e.g. update_account(status=inactive) instead of delete_account).
domain_mismatch in the login_to_rutter response. The merchant picked a platform in the other domain. The slot is still filled — the agent should surface the mismatch and offer a retry.
For anything else, check the Troubleshooting guide or contact support from the dashboard.