Stripe guide
To use Stripe with Rutter, you must create a Stripe account and publish an app on the Stripe Apps Marketplace.
Please note that full integration with Stripe will not work until your app is approved by Stripe. However, you can test by using an "External Testing" OAuth URL.
Create and Publish a Stripe App
- First, register for a Stripe account if you do not already have one.
- Then, create a new Stripe app by following the Stripe documentation here.
- In
stripe-app.json, remove all entries inui_extension.views. You can also delete thesrcdirectory.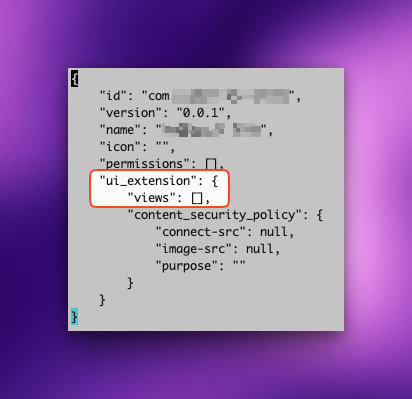
- In the app directory, delete the
srcfolder. Since there is no UI, you will not need any code for your app. - In
stripe-app.json, configure authentication with OAuth. For additional details, see the Stripe documentation.- Set
stripe_api_access_typetooauth - Set
distribution_typetopublic - Add
allowed_redirect_urisarray with the following redirect URI:https://production.rutterapi.com/stripe/proxy/${YOUR_RUTTER_ORG_ID}/redirect. Be sure to substitute${YOUR_RUTTER_ORG_ID}with your Rutter organization ID, which can be found on the Rutter dashboard.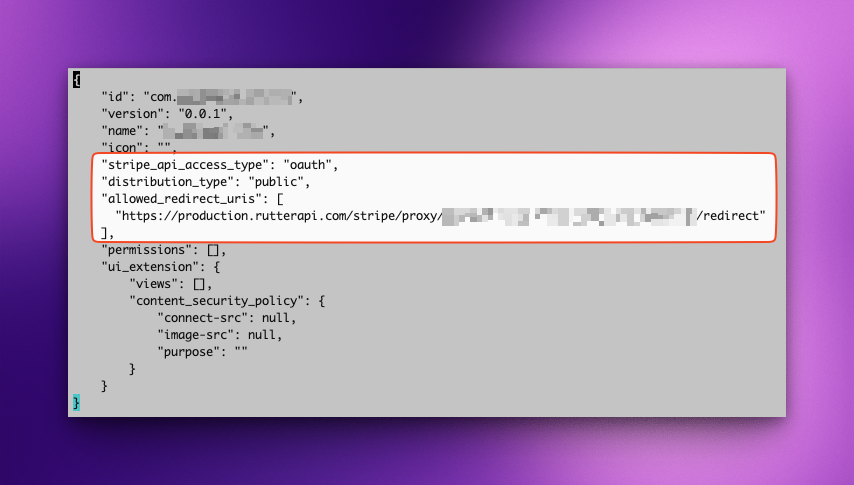
- Set
- Grant the following permissions to the app using the command
stripe apps grant permission "PERMISSION_NAME" "EXPLANATION". For additional details, see the Stripe documentation.connected_account_readapplication_fee_readbalance_readbalance_transaction_source_readcharge_readcustomer_readdispute_readevent_readissuing_authorization_readissuing_transaction_readpayout_readsubscription_read
- Upload the app using the command
stripe apps upload. For additional details, see the Stripe documentation. - Follow the app publish instructions at https://docs.stripe.com/stripe-apps/publish-app.
Connect to Rutter with Stripe Apps
- On the Stripe apps page, navigate to the "Settings" tab and find the "Live mode link". Copy the value of the
client_idquery param. This is your Stripe OAuth Client ID.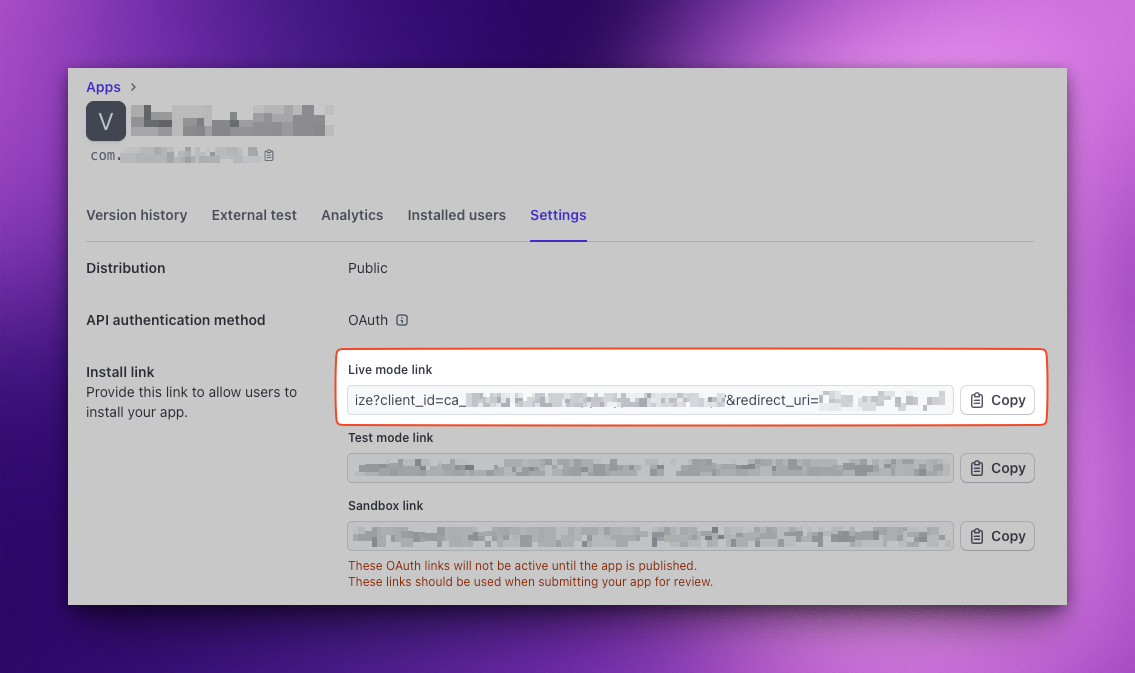
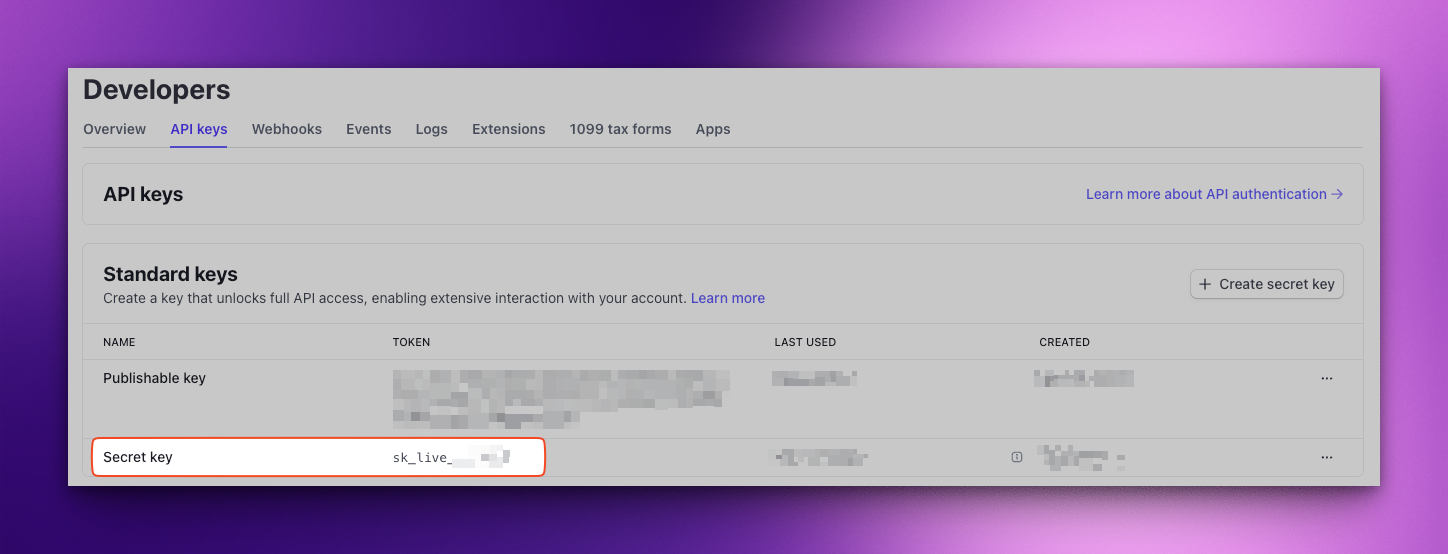
- Head to the Stripe Dashboard to find your Stripe Secret Key.
- Finally, head to the Stripe platform page on Rutter's Dashboard. Copy your Stripe OAuth Client ID and Stripe Secret Key into your Rutter configuration.
Optional - Test Stripe Apps Before Publishing
Before your app is officially published on the Stripe Apps marketplace, you will only be able to establish new connections by using special Stripe OAuth testing endpoints.
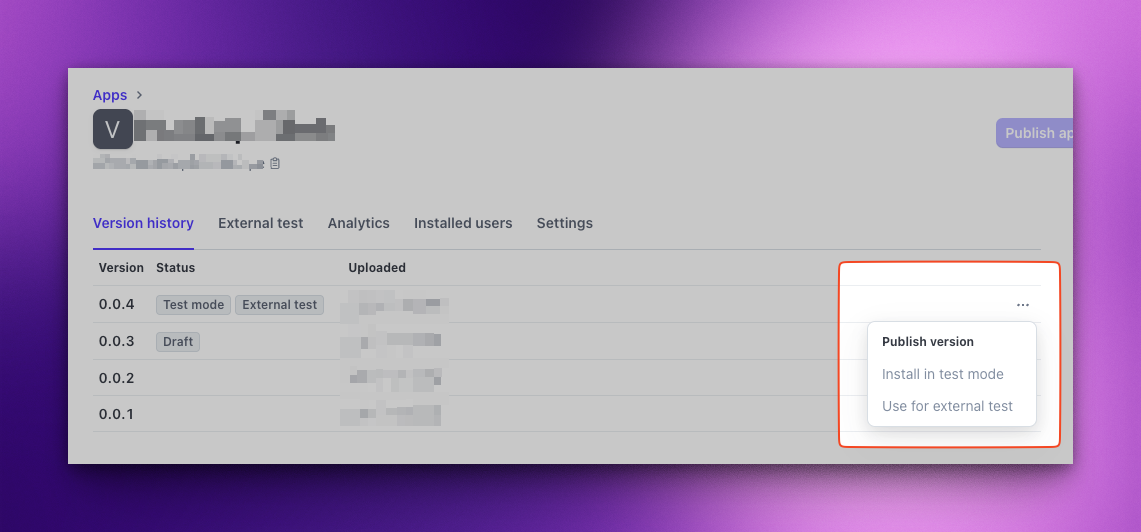
- On the Stripe apps page, navigate to the "Version history" tab. Find the version you want to enable for testing (typically the most recent), click on the "..." button, and select "Use for external test".
- On the Stripe apps page, navigate to the "External Testing" tab. Copy the URL component for the "Live mode link". Be sure not to include the query params. This should look like:
https://marketplace.stripe.com/oauth/v2/chnlink_*/authorize
- Head to the Stripe platform page on Rutter's Dashboard and paste the URL into the "Custom Authorization URL" field.
Optional - Configure Real-Time Webhooks
Rutter supports rapid updates for transactions and payouts made on Stripe via Stripe webhooks. To enable this feature, you must configure Stripe to send webhook events to Rutter and save the webhook signing secret.
On Rutter, open the configuration page for Stripe and navigate to the "Webhooks" tab. Copy the webhook URL.

Go to the Workbench on Stripe, and open the Webhooks tab. Click "Add Destination".
Set the scope of the event destination to "Connected Accounts" and enable all events for "Charge", "Refund", and "Payout".

Set the destination type to "Webhook endpoint".

Paste the webhook URL from your Rutter dashboard.

Copy the webhook signing secret from Stripe, and save it in Rutter.

[Deprecated] Connecting to Rutter with Legacy Extensions
For setting up a new integration between Stripe and Rutter, do not use Legacy Extensions. If you are already using Stripe with Legacy Extensions, it will continue to work as it does today.
As of May 24, 2022, it is no longer possible to create new extensions. On August 31, 2022, Stripe removed all mentions of extensions on the Partner Directory.
- Configure OAuth and specify a redirect URI
- You can configure this setting in the Integration section of the Extensions Settings page
- Go to https://dashboard.stripe.com/settings/connect and add https://production.rutterapi.com/stripe/proxy/${YOUR_RUTTER_ORG_ID}/redirect as a redirect URI for your Stripe integration. You can find your Rutter organization ID here.

- Go to https://dashboard.stripe.com/settings/connect to find your Live Client ID. You can toggle the 'Test Mode' button to receive different IDs

- Go to https://dashboard.stripe.com/apikeys to find your Stripe Secret Key

- Go to https://dashboard.rutterapi.com/platforms/stripe and copy your Stripe Secret Key and OAuth Client ID into your Rutter configuration